How to Work with Attributes in Magento
Attributes arguably the most important organizational tool in Magento.
Introduction
Attributes and Attribute Sets are a very important part of the Magento system and involve more than just how your products display. Plan ahead and know that many items are affected by the attributes and the way they are set up.
Attributes should be created first. Once this is done, you can start creating Attribute Sets. These sets can then be applied to products. It is much easier to build a new site by creating attributes first as this will prevent you from having to revisit each item in your inventory later on to adjust them. They should be applied as you create the product.
Attributes can be used in various areas of the backend, such as filtering for discount price rules, or shown in layered navigation to help the user find what they are searching for. Attributes play a key role in virtually every major area of customer interaction before the sale.
Important Things to Keep In Mind
You can not change an attribute set assigned to a product after the product has been created. You can reconfigure the set afterwards, but whichever set you assign to the product when it is created is the one that will remain assigned to until it is deleted.
Use a naming convention that suits your site. Be consistent with this as it will help you find and create Attribute Sets much easier.
Re-use Attributes whenever possible. Attributes are used in the "compare products" feature and the only way for a comparison to be made side by side is to use the same attribute. "Color" can be compared, but "Hat Color" and "Shoe Color" would be two different attributes and would not show up on the same grid row. Using "Color" for both Hats and Shoes may be more convenient.
Pay attention to Attribute Settings being sure to check which items you want to be available to users on the front end and which ones you may want to stay hidden from view.
Using predefined fields verses just a text area or text box is preferred because it offers more uniformity throughout your site. You will avoid having the same option listed however the admin put it in on each different product. Using a dropdown, or multiple choice feature, will assure you can only pick the available options and they will always appear the same.
The Yes/No feature is nice, but sometimes it is better to choose an attribute style with more flexibility should you want to use the same option for other products while having an options of "Does not apply" or "Yes, at an additional cost".
Creating an Attribute
-
 1Attribute ManagerThis menu allows you to manage and create individual attributes.
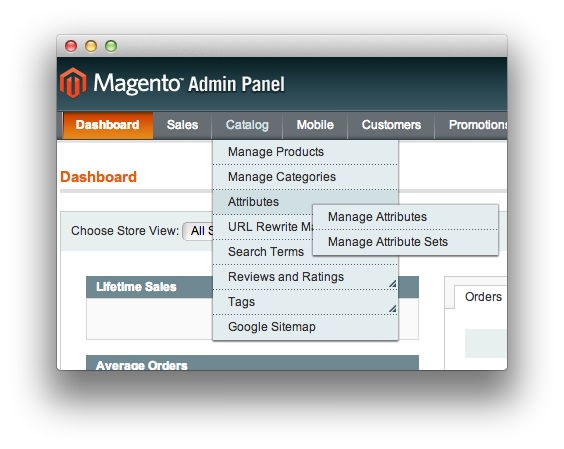
The first step to creating a new attribute is visiting the Attribute Manager by navigating to Admin Panel -> Catalog -> Attributes -> Manage Attributes. This is where you manage individual attributes (apart from Attribute Sets) and create new ones from scratch. These attributes can then be added to Attribute Sets, which can then be applied to new products.
-
 1Add New AttributeThis button initiates the attribute creation process.
Once you have reached this page, you will be able to quickly access and/or create attributes. To create a new attribute, select the Add New Attribute button in the upper-right area of the page.
Attribute Properties
-
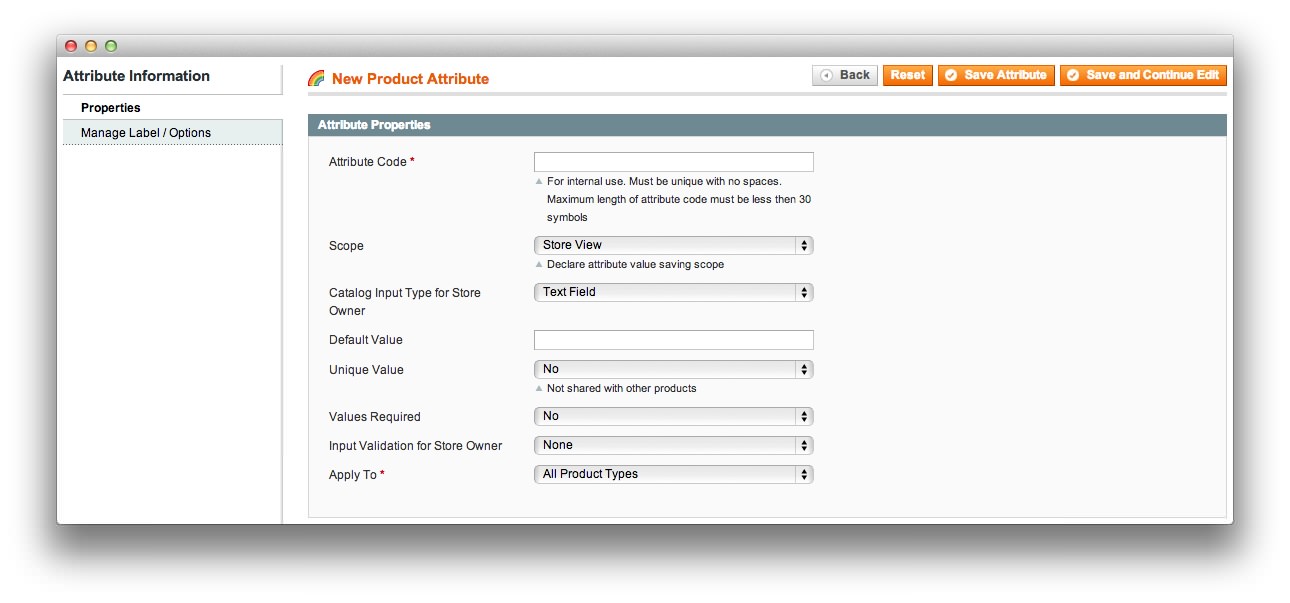 1Attribute CodeThis code is used for internal reference only.2ScopeThis settings determines if the attribute will apply globally, to a single site, or a individual store view.3Catalog Input TypeThis backend setting allows you to choose which type of input you will use to add the attribute to your product(s). You can choose between a number of setting types including text fields (for open-ended attributes) and multiple select (for listed variables).4Unique ValueDetermines if this attribute applies to one item or multiple items in your store.5Values RequiredSets whether or not values are required for this attribute to be applied.6Input Validation for Store OwnerThis sets the type of value the attribute should contain.7Apply ToSets the product type this attribute applies to.
Attribute Code: This code is used for internal reference only.
Scope: This settings determines if the attribute will apply globally, to a single site, or a individual store view.
Catalog Input Type: This backend setting allows you to choose which type of input you will use to add the attribute to your product(s). You can choose between a number of setting types including text fields (for open-ended attributes) and multiple select (for listed variables).
Unique Value: Determines if this attribute applies to one item or multiple items in your store.
Values Required: Sets whether or not values are required for this attribute to be applied.
Input Validation for Store Owner: This sets the type of value the attribute should contain.
Apply To: Sets the product type this attribute applies to.
-
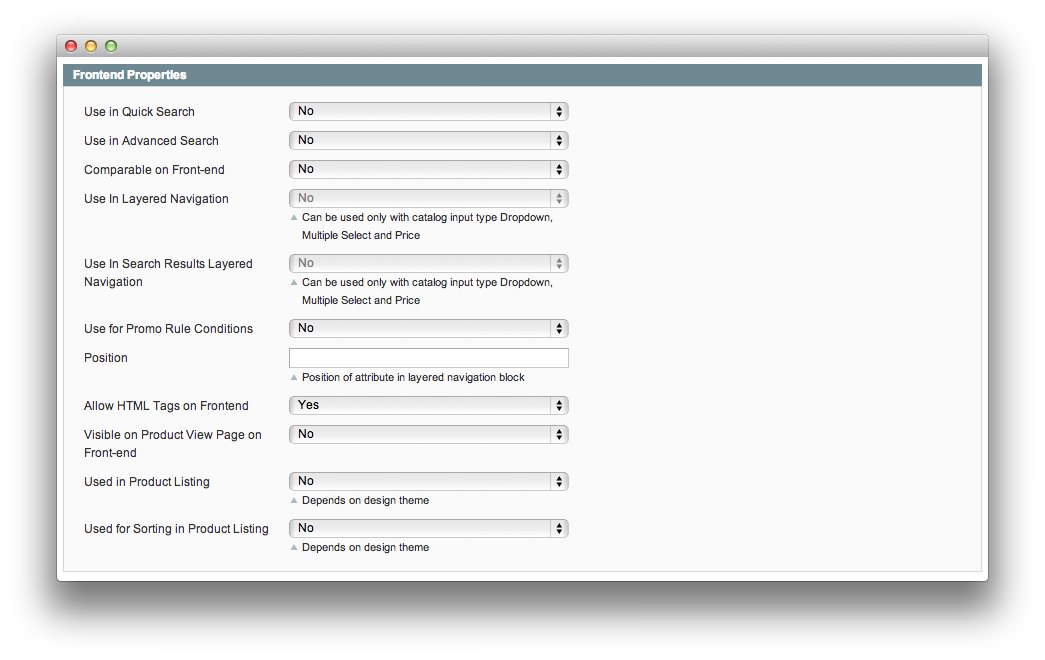 1Use in Quick SearchThis option toggles this attribute's appearance and affect on Quick Search results.2Use in Advanced SearchSets whether or not you wish to have this attribute appear as a filtering option in Advanced Search.3Compare on FrontendToggles whether or not you wish to have this attributed used in comparisons in the frontend.4Use in Layered NavigationThis option determines the attribute's link to layered navigation. You can only use this with Catalog Input Type, Multiple Select, and Price as attribute input types.5Use in Search Results Layered NavigationYou can set whether you want the attribute to be used in Layered Navigation within Search Results.6Use for Promo Role ConditionsUse this option if the attribute is used in determining whether a promo code applies to this product or not.7PositionThis is the position of the attribute within a layered navigation block.8Allow HTML Tags on FrontendSets whether HTML tags are allowed on the frontend for this attribute.9Visable on Product View PageDo you wish to have this attribute visible on the Product View page on the frontend of your site?10Used in Product ListingThis setting determines whether the attribute will be used in product listings. Generally, these are among the most important attributes for that particular product.11Used for Sorting in Product ListingWould you like this attribute to be used to help customers sort products in the Product Listing pages?
Use in Quick Search: This option toggles this attribute's appearance and affect on Quick Search results.
Use in Advanced Search: Sets whether or not you wish to have this attribute appear as a filtering option in Advanced Search.
Compare on Frontend: Toggles whether or not you wish to have this attributed used in comparisons in the frontend.
Use in Layered Navigation: This option determines the attribute's link to layered navigation. You can only use this with Catalog Input Type, Multiple Select, and Price as attribute input types.
Use in Search Results Layered Navigation You can set whether you want the attribute to be used in Layered Navigation within Search Results.
Use for Promo Role Conditions Use this option if the attribute is used in determining whether a promo code applies to this product or not.
Position This is the position of the attribute within a layered navigation block.
Allow HTML Tags on Frontend Sets whether HTML tags are allowed on the frontend for this attribute.
Visible on Product View Page Do you wish to have this attribute visible on the Product View page on the frontend of your site?
Used in Product Listing This setting determines whether the attribute will be used in product listings. Generally, these are among the most important attributes for that particular product.
Used for Sorting in Product Listing Would you like this attribute to be used to help customers sort products in the Product Listing pages?
Attribute Label / Options
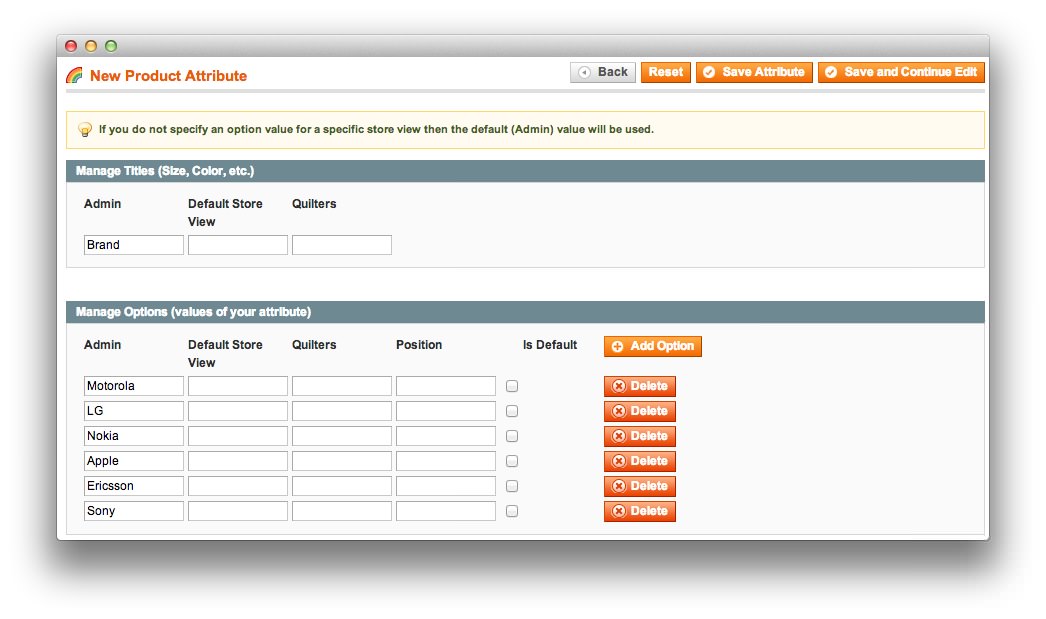
The Attribute Label / Options tab of the **New Attribute page gives you the ability to create preset values for the attribute. If your product attribute is brand, for example, you can list the brands you wish to have appear as an option during product creation and potentially through customer interaction.
If a customer is searching for a Motorola phone, for example, having a Motorola line item in the Brand product attribute makes it easier for customers to find products that match their specifications. If you are using a non-preset variable attribute type (such as Text Field), then the list on the bottom half of this page won't appear.
The Manage Titles area of the page gives you the ability to assign a name to the attribute type. In the sidebar of your store, this name might appear as a title over a list of options assigned to that attribute for sorting.
The columns are put in place to allow you to assign a different name to different store views. For example, Admin assigns a default name to the attribute that remains the same in every store view, unless an alternative name is entered into the field. This is handy if you have multiple languages supported in your various store views and would like to enter the English word for the attribute in one, and (as an example), the Spanish translation to another.
Creating Attribute Sets
Attribute sets are very handy when you have different product types in your store and you would like to quickly assign a set of attributes to complement them. For example, if you carry digital cameras on your site, an attribute set assigned to these products might include these attributes:
- Megapixels
- Sensor
- Memory Type
- Burst Rate
- Color
- Brand
These attributes, when bundled together in an Attribute Set can easily be assigned to a product during its creation. Instead of individually assigning these attributes to each product, you can assign a single set.
To start creating an Attribute Set, you will need to navigate to Admin Panel -> Catalog -> Attributes -> Manage Attribute Sets and select Add New Attribute Set from the upper-right area of the Attribute Set management page.
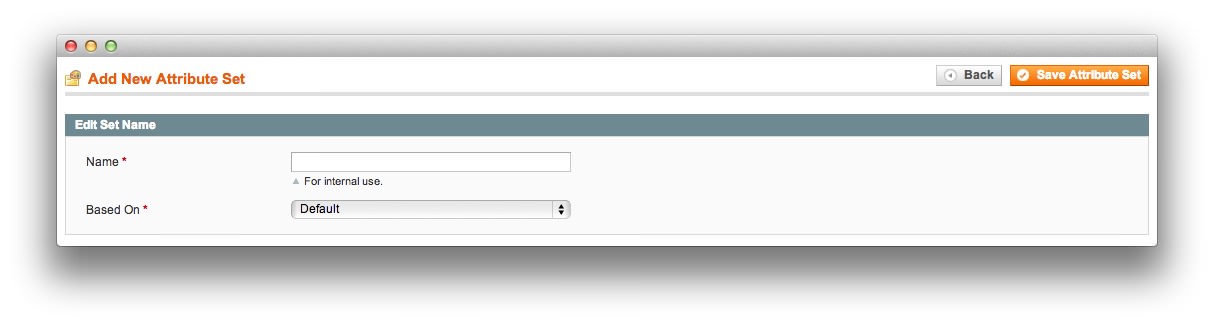
The resulting page will allow you to name your attribute, as well as choose an existing set to base this new set on. The Name of your attribute set should be one you can easily recognize and assign to a specific type of product. For example, if these attributes apply to cameras, you could name the set Cameras. This name is used internally, so it won't appear anywhere on the frontend.
If this is your first Attribute Set, you will want to select Default under Based On. If you have existing Attribute Sets already set up, you can choose one of them and modify it in your new set. This step is intended to save you time.
Once you are done on this page, select Save Attribute Set.

The next page is where you assign attributes to the set. The right column, titled Unassigned Attributes includes any attributes that have not yet been assigned to a set. You will also find different groups under the Groups column. These groups are used to apply sorting rules and display options on the frontend, as well as to create tabs within the product page.
Select Add New under the Groups column to create a new group. It is useful to name the group in a way that matches the type of product you are applying it to. For example, camera-specific attributes could be added to the Cameras group within your new set.
You can then click and drag unassigned attributes to the new group by moving them from the Unassigned Attributes column to the group folder in the Groups column. If you wish to remove an existing attribute, you can do so by dragging it from the Groups column to the Unsassigned Attributes column. You can also double-click any existing group name to rename it.
Once you have configured the set the way you would like it, select Save Attribute Set.
Note: Remember that attribute sets can not be reassigned once a product has been created. You can modify attribute sets to your heart's content, but creating a new set and assigning it to an existing product is not currently possible.
You can find more information about assigning attributes to products in our product creation tutorial.