There are many 3rd party components and modules which can advance your menu system. These are designed to fill the voids within templates that lack the inbuilt menu setups of suckerfish, transmenu and moomenu from the Template Clubs. They are not replacements to the inbuilt menu structure of a template but optional extras, for templates which lack the depth of a Template Club template such as the default Joomla! templates, Solarflare.
There are different types of 3rd party menu addons, the most popular and frequent, being the drop down menus in the form of Transmenu. The tutorial will focus upon how to install these menu systems into RokWebify with some basic configuration and CSS edits to make it blend into your template.
The Menu systems is Transmenu from Joomlart which is applicable to most other modules of this sort.
2. The next process is to install the module into Joomla!
You must login to your administrator panel at www.yoursiteURL.com/administrator
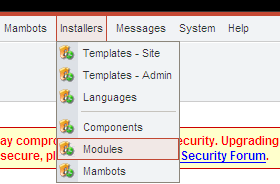
Scroll over the Installers link item on the top navigation taskbar, you will then observe a drop down menu with Modules as one of the selectable items. Select this button to access to Module Installer Control Panel.
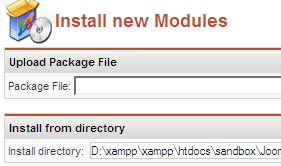
3. Once you have entered the Module Installer Control Panel, you will see 2 installation options, Upload Package File and Install from Directory. In most circumstances, the first option of Upload Package File will be sufficient. Select the Browse button to scan through the files on your local directory for the zipped module package. Choose the OK option when you can successfully found the package. You will then press the Upload file & install button to process the installation of the module.
In some situations, installation fails, and in this instance, we have to use the Install from Directory feature. For this scenario, you will have to Unzip the module package onto your local PC. You shall subsequently FTP the module folder onto your webserver. Next, you shall enter the absolute path to the modules .xml file. For example, /host/home/username/htdocs/Joomla/installer/
modules/mod_transmenu/mod_transmenu.xml. Then select Install
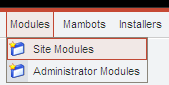
4. Now that the module has been installed, we must then configure it for our needs. Scroll over the Modules item on the top taskbar in your Joomla! administration area, follow the drop down menu to Site Modules and select.
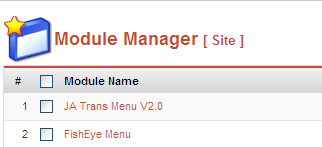
1. For the 3rd party transmenu to function properly with the RokWebify template, we must change its settings in the Module manager.
The following settings are best for maximum functionality and integration into the template
Show Title: No
Position: User3
Menu Item Links: All
Menu Class Suffix: -nav
Menu Style: Horizontal
Menu Direction: Down
Menu Position Relation: Bottom Left
All other settings are fine as the default or can be changed for personal preferences
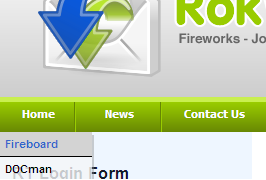
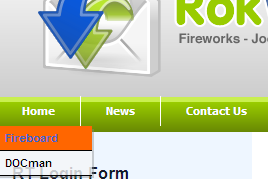
The screenshot below shows you how the Transmenu will look from all the previous steps previous.
As you can see, the menu's visuals are not conforming to the style of RokWebify. Therefore, we must edit the CSS so we can have the more integrated feel
2. Open the template_css.css file located in rt_rokwebify/css
Locate the following section in the template_css.css file
div#horiz-menu a:link,
div#horiz-menu a:visited {
display: block;
float: left;
padding: 0 25px;
height: 30px;
line-height: 30px;
font-weight: bold;
color: #fff;
text-decoration: none;
}
You must then make the following alterations to the above section in the template_css.css file
div#horiz-menu a:link,
div#horiz-menu a:visited {
display: block;
float: left;
padding: 0 25px;
height: 30px;
line-height: 30px;
font-weight: bold;
color: #fff;
text-decoration: none;
margin-top: 6px;
}

3. Open transmenuh.css which is located within modules/ja_transmenu
From the file stated above, locate the following code
a.mainlevel-trans:link,
a.mainlevel-trans:visited {
font-family: Tahoma, Helvetica,
sans-serif;
text-decoration:none;
font-size: 11px;
font-weight:bold;
color:#000;
white-space:nowrap;
line-height: 26px;
border-right: 1px solid #FFF;
display: block;
height: 26px;
width:auto;
margin: 0px;
padding: 0px 15px 0px 29px;
}
We must then make the following alterations.
a.mainlevel-trans:link,
a.mainlevel-trans:visited {
font-family: Tahoma, Helvetica,
sans-serif;
text-decoration:none;
font-size: 11px;
font-weight:bold;
color:#000;
white-space:nowrap;
line-height: 26px;
border-right: 1px solid #668603;
border-left: 1px solid #99CC00;
display: block;
height: 26px;
width:auto;
margin: 0px;
padding: 0px 15px 0px 29px;
}
Once you have carried out the above changes, we must then follow on by editing the code beneath.
a.mainlevel_active-trans,
a.mainlevel_active-trans:visited {
font-family: Tahoma, Helvetica,
sans-serif;
text-decoration:none;
font-size: 11px;
font-weight:bold;
color:#FFF;
white-space:nowrap;
line-height: 26px;
border-right: 1px solid #FFF;
display: block;
height: 26px;
width:auto;
margin: 0px;
padding: 0px 15px 0px 29px;
background: url(img/arrow.png)
12px 10px no-repeat;
}
Change the code to the section below.
a.mainlevel_active-trans,
a.mainlevel_active-trans:visited {
font-family: Tahoma, Helvetica,
sans-serif;
text-decoration:none;
font-size: 11px;
font-weight:bold;
color:#FFF;
white-space:nowrap;
line-height: 26px;
border-right: 1px solid #668603;
border-left: 1px solid #99CC00;
display: block;
height: 26px;
width:auto;
margin: 0px;
padding: 0px 15px 0px 29px;
/*background: url(img/arrow.png)
12px 10px
no-repeat;*/
}
This alteration serves 2 purposes. The first is to remove the white border which does not blend with the menu bar's green background by replacing the border-right with the colour used by the divider image in the default menu. The latter, is it adds a second border to the left which completes the mimicing effect from the default menu. With this, a user would not be able to tell a difference in your menu.
The 1px denotes the width of the border, therefore, increasing the number will produce a thicker divider. Solid represents the style of the border, you can also have dotted, dashed and a range of others. #FFF illustrates the colour of the border, the colours are in HEX code format so change accordingly.

4. The final alteration to the Transmenu extension system, is to the background colour of the sub menu items. The luminous orange does not blend with the lighter, calmer colours of the RokWebify template. Therefore, we must change the CSS of transmenuh.css again in order to achieve the last step in our customisations. In conjunction with the hover alteration, we must also change the colour for sub menu visited item, the hover of a visited item and finally, the colour of the the hover text.
.transMenu .item.hover {
background: #FF6600;
}
Change #FF6600 to any hex colour which you deem appropriate in your styling. In the following example we have used #D3D3D3
.transMenu .item.hover {
background: #D3D3D3;
}
.transMenu .item.hover td {color:#3366CC;}
#3366CC denotes the colour of the font, you may wish to change this to any colour you deem appropriate
.transMenu .item#active {
background:#ff0000;
color:black;
-moz-opacity:.6;
filter:alpha(opacity=60);
}
Change #ff0000 to the colour of your choice. Remember, due to the opacity, the colour will not appear the same as you wish to, for example, the current HEX colour is primary red but appears as pink.
We changed it to #a8c264 to blend with the green of the template.
.transMenu .item#active.hover {
background:#3366CC;
}
Change #3366CC to the colour of your choice.
We changed it to #7d8f4c which is a darker green of the inactive background.
The result of all this CSS editing and configuration can be witnessed in the screenshot below.