Visage: Recreating the Demo - Bottom
Your Guide to Recreating Elements of the Visage Theme for WordPress
Bottom Section
-
 1Text 12Text 2
Here is the widget breakdown for the Bottom section:
- Text
- Gantry Divider
- Text
Text 1
This section of the page is a standard text widget. You will need to enter the following in the main text field.
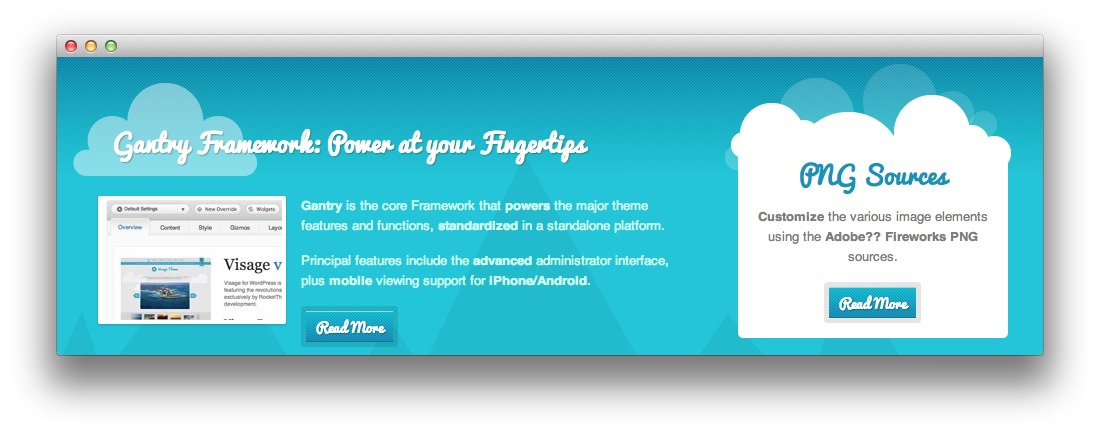
<img src="http://demo.rockettheme.com/live/wordpress/visage/wp-content/rockettheme/rt_visage_wp/frontpage/fp-bottom1.jpg" width="180" height="120" alt="image" class="rt-image floatleft"/>
<p><strong>Gantry</strong> is the core Framework that <strong>powers</strong> the major theme features and functions, <strong>standardized</strong> in a standalone platform.</p>
<p>Principal features include the <strong>advanced</strong> administrator interface, plus <strong>mobile</strong> viewing support for <strong>iPhone/Android</strong>.</p>
<a href="http://demo.rockettheme.com/live/wordpress/visage/features/" class="readon"><span>Read More</span></a>
Here is a breakdown of options changes you will want to make to match the demo.
- Enter
Gantry Framework: Power at your Fingertipsin the Title field. - Set the Title Variation to Title 1.
- Set the Margin Variation to No Margin Bottom.
- Set the Padding Variation to No Padding Bottom.
- Leaving everything else at its default setting, select Save.
Gantry Divider
This widget tells WordPress to start a new widget column beginning with the widget placed directly below the divider in the section.
Text 2
This section of the page is a standard text widget. You will need to enter the following in the main text field.
<p><strong>Customize</strong> the various image elements using the <strong>Adobe?? Fireworks PNG</strong> sources. </p>
<a href="http://demo.rockettheme.com/live/wordpress/visage/tutorials/logo-editing/" class="readon"><span>Read More</span></a>
Here is a breakdown of options changes you will want to make to match the demo.
- Enter
PNG Sourcesin the Title field. - Set the Box Variation to Box 1.
- Set the Margin Variation to No Margin Bottom.
- Set the Padding Variation to No Padding Bottom.
- Enter
rt-centerin the Custom Variations field. - Leaving everything else at its default setting, select Save.
Found errors? Think you can improve this documentation? Please edit this page. You can also view the history of this page.