Osmosis: Recreating the Demo - Sidepanel
Your Guide to Recreating Elements of the Osmosis Theme for WordPress
Sidepanel Section
-
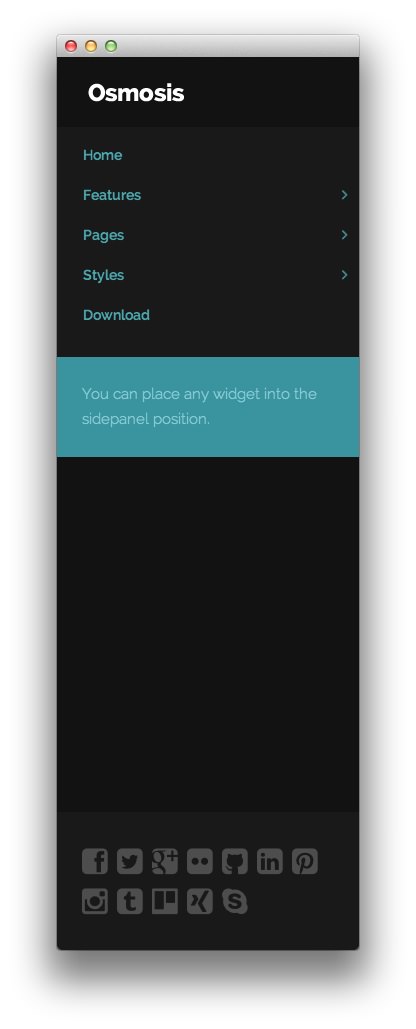 1Gantry Side Panel Logo2Gantry Menu3Text4Text
The Sidepanel widget section gives you the ability to display widgets that alongside a dynamic logo and menu that appear as you scroll down the page. This makes it possible to have specific widgets (such as a menu) remain accessible to the user no matter how far they have scrolled down to the bottom of the page.
In the home page of our demo, we used a collection of widgets that appear and/or move as you scroll down the page.
The SidePanel position can be home to any widget type. Any widgets you assign to the position will be static, while you have the option of adding the logo and sidepanel menu as dynamic elements that appear as you scroll down the page. This ensures that your visitors will be able to see your logo and access the main menu from anywhere on the page.
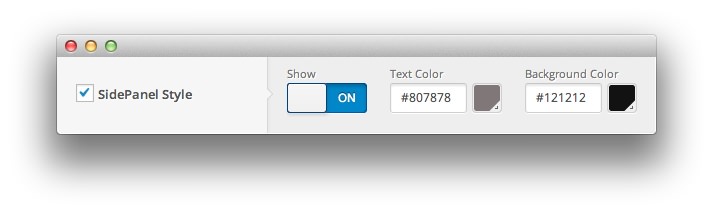
You can turn the SidePanel on and off via the theme settings menu. You can reach these settings by navigating to Admin > Osmosis > Style and toggling the SidePanel Style setting.
The Gantry Side Panel Logo and Gantry Menu widgets appear dynamically as you scroll while the two Text widgets are always displayed. The Gantry Side Panel Logo widget is made specifically for this case and needs to be in place in order for the logo to appear as you scroll. The Gantry Menu widget uses a Custom Chrome setting to make it appear dynamically.
Here is the widget breakdown for the Sidepanel section:
- Gantry Side Panel Logo
- Gantry Menu
- Text
- Text
Gantry Logo
The first thing you will need to do is click and drag the Gantry Side Panel Logo widget from the Available Widgets area of the Widgets menu to the appropriate section. Once this is done, the logo should appear in as it does in the demo.
Gantry Menu
The Gantry Menu widget should be set to match your site's main menu as it serves as the primary menu widget for the entire site. You can customize this menu by navigating to Administration -> Appearance -> Menus and creating or modifying your selected menu there.
Here is a breakdown of the widget options for this menu widget. Any options not present in this breakdown are left at default and should not be adjusted.
| Option | Setting |
|---|---|
| Menu | Main Menu |
| Menu Theme | Sidebar Menu |
| Limit Levels | No |
| Start Level | 0 |
| End Level | 0 |
| Show All Children | Yes |
| Show Empty Menu | No |
| Maximum Depth | 10 |
| Custom Chrome | Side Panel Menu |
Text
This section of the page is a standard text widget. You will need to enter the following in the main text field.
<span>You can place any widget into the sidepanel position.</span>
Here is a breakdown of options changes you will want to make to match the demo.
- Switch the Widget Variations option to Box 2.
- Leaving everything else at its default setting, select Save.
Text
This section of the page is a standard text widget. You will need to enter the following in the main text field.
<a href="#" class="fp-sidepanel-social-icon"><span class="fa fa-facebook-square"></span></a>
<a href="#" class="fp-sidepanel-social-icon"><span class="fa fa-twitter-square"></span></a>
<a href="#" class="fp-sidepanel-social-icon"><span class="fa fa-google-plus-square"></span></a>
<a href="#" class="fp-sidepanel-social-icon"><span class="fa fa-flickr"></span></a>
<a href="#" class="fp-sidepanel-social-icon"><span class="fa fa-github-square"></span></a>
<a href="#" class="fp-sidepanel-social-icon"><span class="fa fa-linkedin-square"></span></a>
<a href="#" class="fp-sidepanel-social-icon"><span class="fa fa-pinterest-square"></span></a>
<a href="#" class="fp-sidepanel-social-icon"><span class="fa fa-instagram"></span></a>
<a href="#" class="fp-sidepanel-social-icon"><span class="fa fa-tumblr-square"></span></a>
<a href="#" class="fp-sidepanel-social-icon"><span class="fa fa-trello"></span></a>
<a href="#" class="fp-sidepanel-social-icon"><span class="fa fa-xing-square"></span></a>
<a href="#" class="fp-sidepanel-social-icon"><span class="fa fa-skype"></span></a>
Here is a breakdown of options changes you will want to make to match the demo.
- Enter
rt-sidepanel-bottom fp-sidepanel-03in the Custom Variations field. - Leaving everything else at its default setting, select Save.