ModalHeader
Your Guide to the ModalHeader Extension for Magento
Introduction
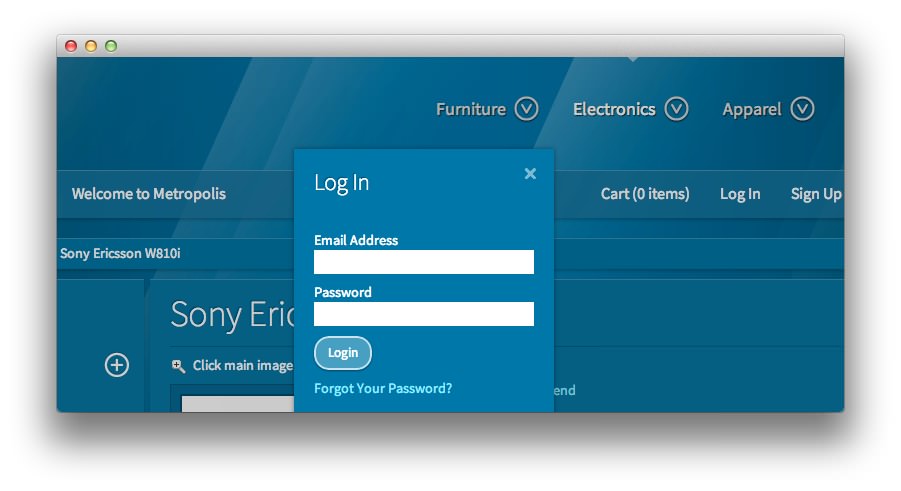
The ModalHeader module adds in some extra functionality to the header section of a Magento store. It connects the "Log In" link to a modal login form, and adds a text-resizer. It adds a modal shopping cart viewer, and adds styling to the search form and breadcrumbs. The modal window animation parameters can be tweaked from the admin config.
Setup
RokMage Modules can be managed via the configuration interface accessible by navigating to Admin -> System -> Configuration and clicking on the corresponding extension in the sidebar under RokMage Modules.
You will want to make sure that the Configuration Scope is set to the theme you wish to modify the settings unless you wish to change the default for all scopes.
-
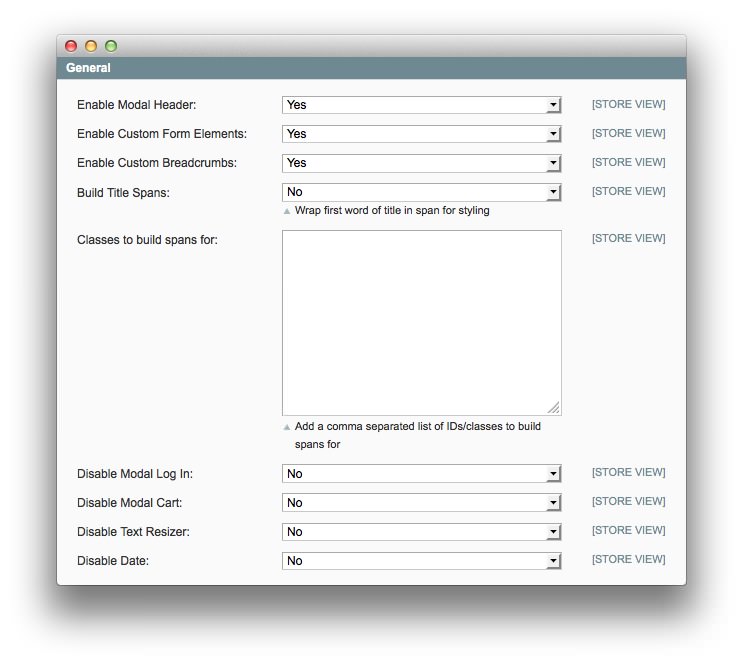 1Enable Modal HeaderEnables or disables the modal header module.2Enable Custom Form ElementsAllows you to enable or disable the present of form elements in the modal header.3Enable Custom BreadcrumbsEnables or disables the custom breadcrumbs element.4Build Title SpansAllows you to build spans around the first word of titles for special styling.5Classes to Build Spans forClasses you want to have spans built for.6Disable Modal Log InDisables just the modal log in.7Disable Modal CartDisables just the modal cart.8Disable Text ResizerTurns off the text resizer element in the header.9Disable DateDisables the date display in the header.
Enable Modal Header: Enables or disables the modal header module.
Enable Custom Form Elements: Allows you to enable or disable the present of form elements in the modal header.
Enable Custom Breadcrumbs: Enables or disables the custom breadcrumbs element.
Build Title Spans: Allows you to build spans around the first word of titles for special styling.
Classes to Build Spans for: Classes you want to have spans built for.
Disable Modal Log In: Disables just the modal log in.
Disable Modal Cart: Disables just the modal cart.
Disable Text Resizer: Turns off the text resizer element in the header.
Disable Date: Disables the date display in the header.
-
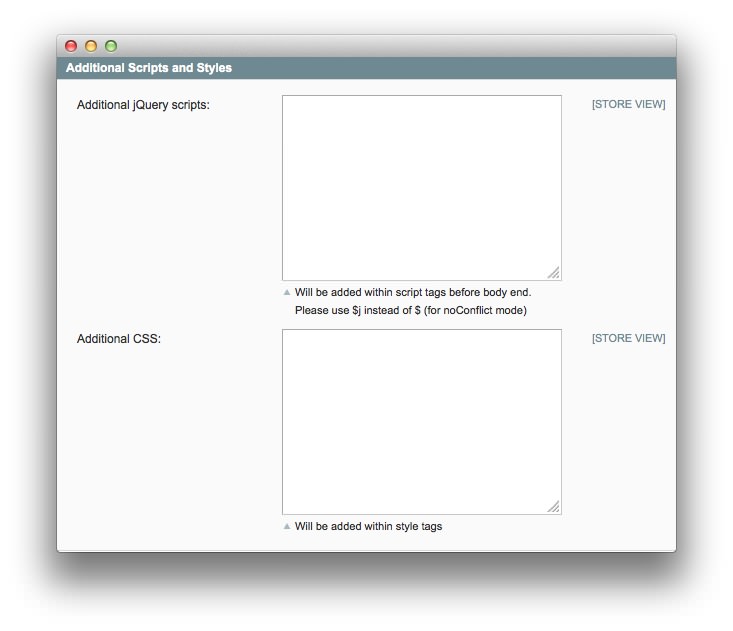 1Additional jQuery ScriptsThis field enables you to add additional jQuery scripts before the body end. Use $j instead of $j (for noConflict mode).2Additional CSSAllows you to add any additional CSS elements.
- Additional jQuery Scripts: This field enables you to add additional jQuery scripts before the body end. Use $j instead of $j (for noConflict mode).
- Additional CSS: Allows you to add any additional CSS elements.
-
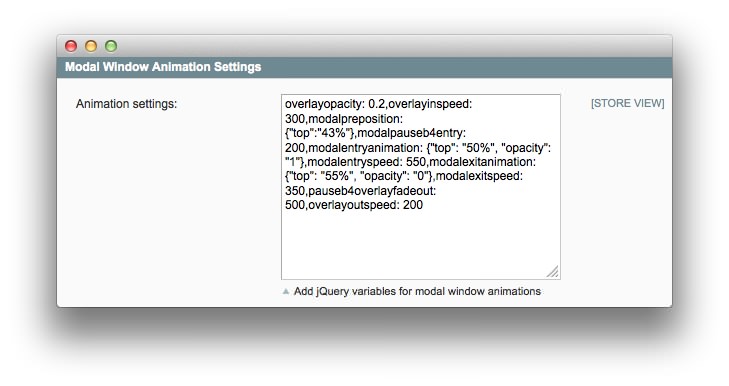 1Animation SettingsThis field contains jQuery variables for modal window animations. Supported variables are listed below.
- Animation Settings: This field contains jQuery variables for modal window animations. Supported variables are listed below.
Option Examples
- overlayopacity: 0.2 ⇒ Sets the opacity of the overlay window.
- overlayinspeed: 300 ⇒ Sets the speed in which the overlay will appear.
- modalpreposition: {"top":"43%"} ⇒ Sets the position of the modal window before it is visible.
- modalpauseb4entry: 200 ⇒ Sets the pause before the modal window comes into view.
- modalentryanimation: {"top": "50%", "opacity": "1"} ⇒ Defines the animation for the modal window coming into view.
- modalentryspeed: 550 ⇒ Sets the speed for the modal window coming into view.
- modalexitanimation: {"top": "55%", "opacity": "0"} ⇒ Defines the animation for the modal window going out of view.
- modalexitspeed: 350 ⇒ Sets the speed for the modal window going out of view.
- pauseb4overlayfadeout: 500 ⇒ Sets the pause before the overlay fades out, after the modal window is hidden.
- overlayoutspeed: 200 ⇒ Sets the speed in which the overlay will disappear.
-
 1Add Classes for PIEThis field allows you to enter a comma separated list of IDs/classes to apply PIE.js to.2Redirect IE6/7 VisitorsEnables IE6/7 redirection to the Unsupported Browser warning page.3Load IE6/7 Helper FilesEnables or disables helper files and CSS/JavaScript fixes for sites that wish to continue IE 6/7 support.4Add Classes for IE6 PNG FixThis field allows you to enter a comma separated list of IDs/classes to apply the PNG fix to.
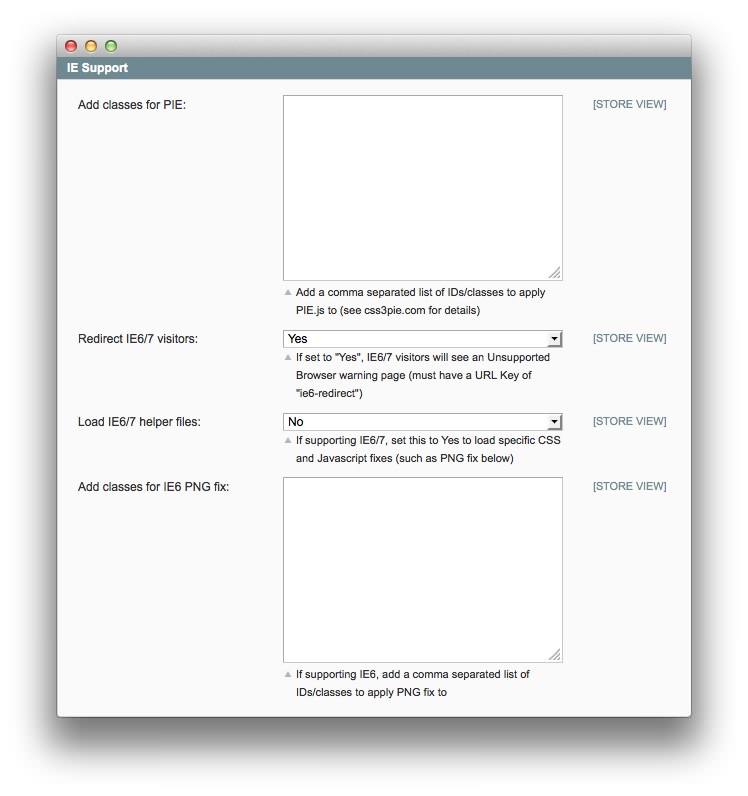
Add Classes for PIE: This field allows you to enter a comma separated list of IDs/classes to apply PIE.js to.
Redirect IE6/7 Visitors: Enables IE6/7 redirection to the Unsupported Browser warning page.
Load IE6/7 Helper Files: Enables or disables helper files and CSS/JavaScript fixes for sites that wish to continue IE 6/7 support.
Add Classes for IE6 PNG Fix: This field allows you to enter a comma separated list of IDs/classes to apply the PNG fix to.
How to Install
You can download a zip package from the RokMage Extensions using the Download button above..
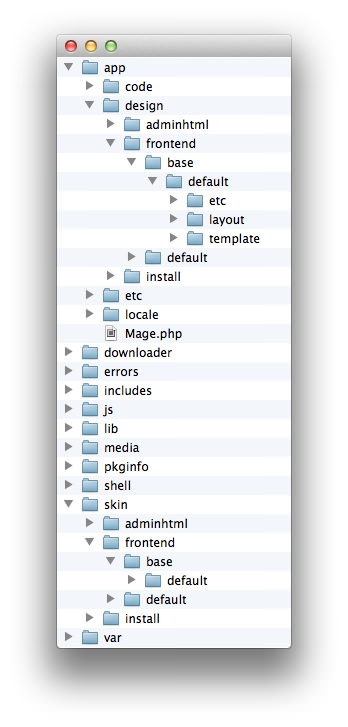
Once you have downloaded and unzipped the extension package, you will notice that the folder structure for the files has been included. This means you can simply copy the files/folders over to the corresponding folder of your Magento site, if developing locally.
If you are developing on a remote server, you can simply upload the app and skin folders to the Magento install on your server.
-
 1This can also be the name of your template package.2This can also be the name of your template package.
Magento uses a hierarchy system. Adding the files in the base folder will work with any theme package. You can also elect to add the layout, template, and skin files to your theme package folder (instead of base) in order to have the extension apply only to that theme. Anything placed in the theme package folder will override what exists in the base folder. Anything in the base folder is accepted as default.
If you download a RocketTheme Magento template, the extension files will all be included in the theme package folder, not the base folder.