ContentSlider
Your Guide to the ContentSlider Extension for Magento
Introduction
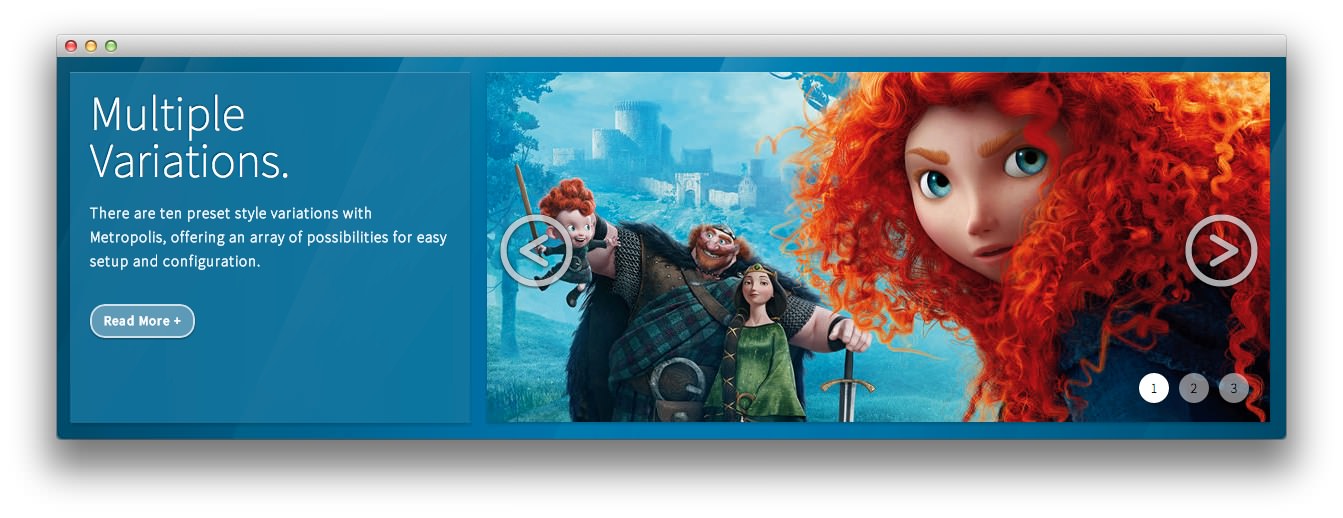
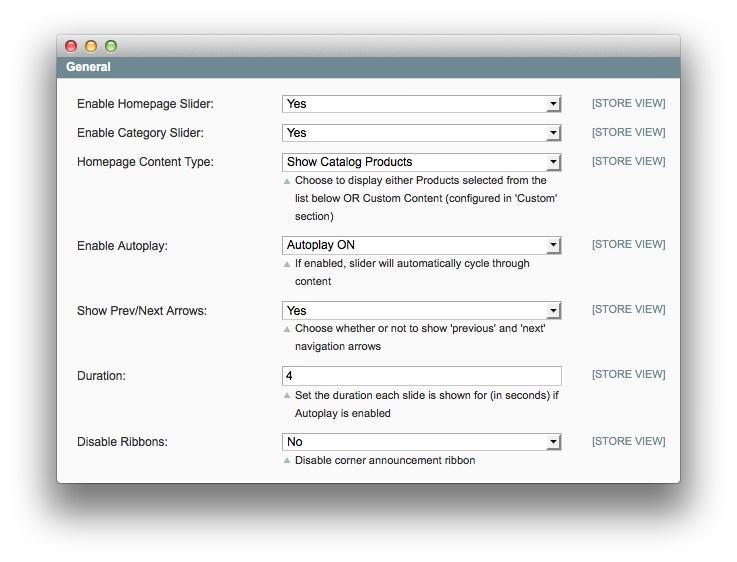
The ContentSlider module adds a content slider to the hompage and category pages. Both sliders can be fully configured from the admin section. The first section has settings that apply to both sliders. You can choose whether or not to enable Autoplay, whether to show the 'previous' and 'next' arrows, and also set the duration that each slide will display for.
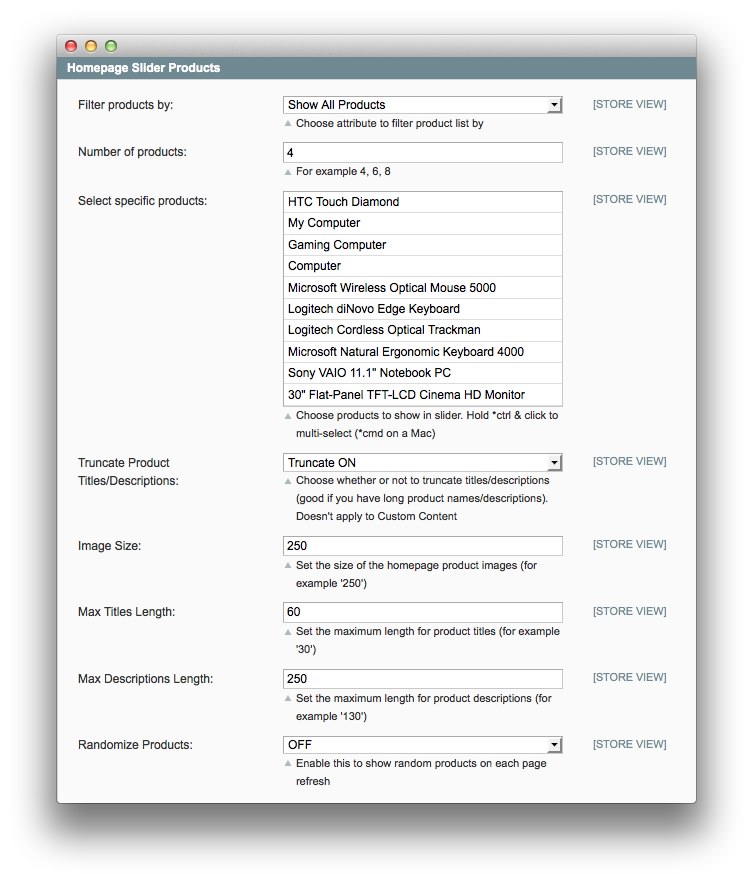
Both sliders are identical, however, the homepage slider has the option of showing custom content as well as catalog products. If you choose to show catalog products, you have the following options available. First, you can choose how to filter the products that will be shown (choosing between Select Specific Products From List Below, Show All Products, Featured Products, Best Selling Products, Recently Added Products, Most Viewed Products, & Highest Rated Products).
NOTE: If you wish to use dynamically updating lists (Best-Selling, Recently Added, Most Viewed, & Highest Rated) you will need to disable the cache for Blocks HTML output by going to System -> Cache Management in the admin. If not, the lists won't be updated, and the cached version will be displayed.
If you choose to Select Specific Products From List Below, you can use the multi-select list to choose which products to show. Simply click the products in the list while holding CTRL (or CMD if using a Mac). You can also choose to truncate titles and descriptions, as well as whether to randomize the products, or show them in the catalog order.
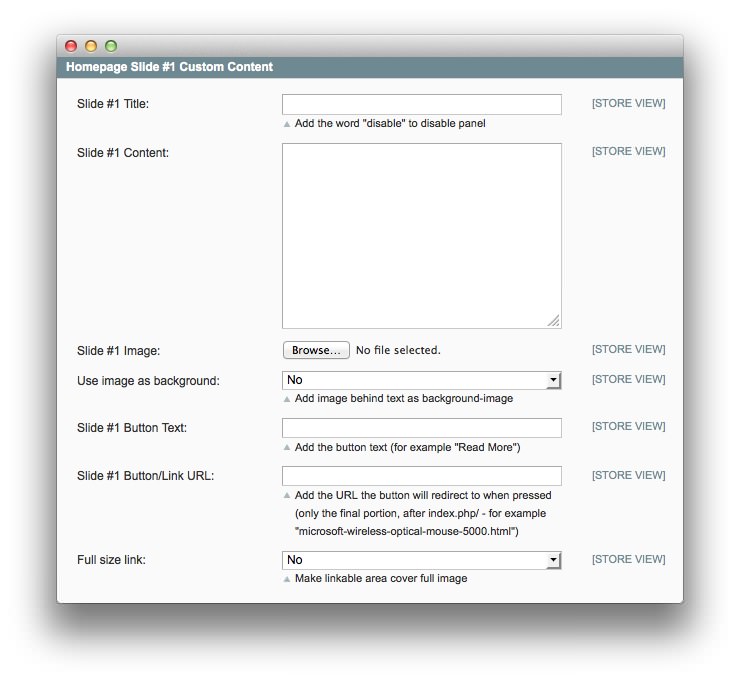
If you choose to show custom content, you can go to the Homepage slides section at the bottom. Each slide has its own section, where you can specify a title, the text for the content, an image to show, the text for the button link, and the URL that the button will redirect to.
NOTE: You only need to add the final portion of the URL, after index.php/. For example: microsoft-wireless-optical-mouse-5000.html.
Setup
RokMage Modules can be managed via the configuration interface accessible by navigating to Admin -> System -> Configuration and clicking on the corresponding extension in the sidebar under RokMage Modules.
You will want to make sure that the Configuration Scope is set to the theme you wish to modify the settings unless you wish to change the default for all scopes.
-
 1Enable Homepage SliderSets whether you wish to enable or disable the slider on the home page.2Enable Category SliderAllows you to enable or disable the slider in category views.3Homepage Content TypeDetermines the content that appears in the slider on the home page.4Enable AutoplayAllows you to enable or disable autoplay on sliders.5Show Prev/Next ArrowsThis option toggles whether navigation arrows will appear in your slider.6DurationSets the duration (in seconds) between slide switches during autoplay.7Disable RibbonsEnables or disables the appearance of corner announcement ribbons in the slider.
Enable Homepage Slider: Sets whether you wish to enable or disable the slider on the home page.
Enable Category Slider: Allows you to enable or disable the slider in category views.
Homepage Content Type: Determines the content that appears in the slider on the home page.
Enable Autoplay: Allows you to enable or disable autoplay on sliders.
Show Prev/Next Arrows: This option toggles whether navigation arrows will appear in your slider.
Duration: Sets the duration (in seconds) between slide switches during autoplay.
Disable Ribbons: Enables or disables the appearance of corner announcement ribbons in the slider.
-
 1Filter Products BySets the filtering rules for products that appear on the slider on the home page.2Number of ProductsSets the number of products that appear on the homepage slider.3Set Specific ProductsAllows you to pick and choose specific products to appear on the slider.4Truncate Product Titles/DescriptionsThis option toggles truncating for product names and descriptions.5Image SizeSets the size (in pixels) of the homepage product images.6Max Titles LengthSets the maximum length (in characters) for product titles.7Max Descriptions LengthSets the maximum length (in characters) for product descriptions.8Randomize ProductsSets whether or not products will appear randomly in the slider on each page refresh.
Filter Products By: Sets the filtering rules for products that appear on the slider on the home page.
Number of Products: Sets the number of products that appear on the homepage slider.
Set Specific Products: Allows you to pick and choose specific products to appear on the slider.
Truncate Product Titles/Descriptions: This option toggles truncating for product names and descriptions.
Image Size: Sets the size (in pixels) of the homepage product images.
Max Titles Length: Sets the maximum length (in characters) for product titles.
Max Descriptions Length: Sets the maximum length (in characters) for product descriptions.
Randomize Products: Sets whether or not products will appear randomly in the slider on each page refresh.
-
 1Filter Products BySets the filtering rules for products that appear on the slider on the category slider.2Number of ProductsSets the number of products that appear on the slider.3Truncate Product Titles/DescriptionsThis option toggles truncating for product names and descriptions.4Image SizeSets the size (in pixels) of the homepage product images.5Max Titles LengthSets the maximum length (in characters) for product titles.6Max Descriptions LengthSets the maximum length (in characters) for product descriptions.7Hide DescriptionsAllows you to elect whether or not you want descriptions hidden on the category slider.8Randomize ProductsSets whether or not products will appear randomly in the slider on each page refresh.
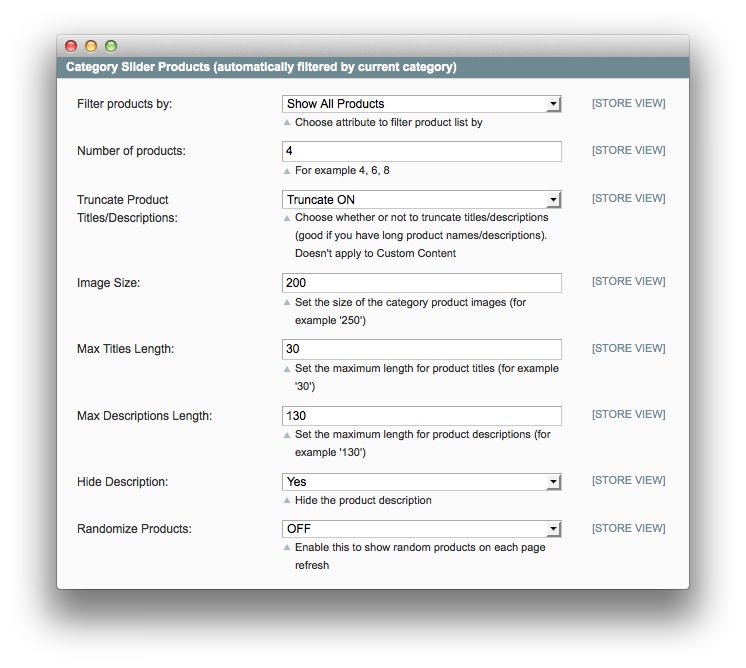
Filter Products By: Sets the filtering rules for products that appear on the slider on the category slider.
Number of Products: Sets the number of products that appear on the slider.
Truncate Product Titles/Descriptions: This option toggles truncating for product names and descriptions.
Image Size: Sets the size (in pixels) of the homepage product images.
Max Titles Length: Sets the maximum length (in characters) for product titles.
Max Descriptions Length: Sets the maximum length (in characters) for product descriptions.
Hide Descriptions: Allows you to elect whether or not you want descriptions hidden on the category slider.
Randomize Products: Sets whether or not products will appear randomly in the slider on each page refresh.
-
 1Slide TitleSets the title that appears in the panel. Leave blank for no title.2Slide ContentThis box is where you put any content you wish to have appear in the panel. You can enter HTML, or stick to basic text.3Slide ImageAllows you to select and upload an image to use in the panel.4Use Image as BackgroundEnables or disables the use of the uploaded image as a background to the panel.5Slide Button TextThis sets the text you want to appear on the button.6Slide Button LinkSets the link the button sends the user to.7Full Size LinkAllows you to make the full area of the image act as a clickable link.
Custom Content blocks (like this one) allow you to add custom content that does not necessarily associate directly with any products. You can use these to bring attention to a general promotion, feature an upcoming event associated with your store, or any number of other custom content types. You can disable these panels by typing disable in the Title field.
Slide Title: Sets the title that appears in the panel. Leave blank for no title.
Slide Content: This box is where you put any content you wish to have appear in the panel. You can enter HTML, or stick to basic text.
Slide Image: Allows you to select and upload an image to use in the panel.
Use Image as Background: Enables or disables the use of the uploaded image as a background to the panel.
Slide Button Text: This sets the text you want to appear on the button.
Slide Button Link: Sets the link the button sends the user to.
Full Size Link: Allows you to make the full area of the image act as a clickable link.
How to Install
You can download a zip package from the RokMage Extensions using the Download button above..
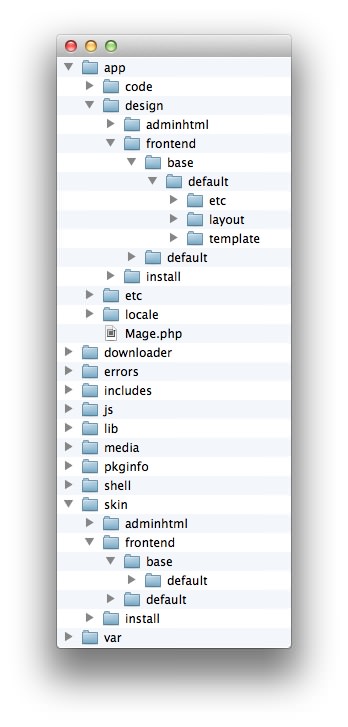
Once you have downloaded and unzipped the extension package, you will notice that the folder structure for the files has been included. This means you can simply copy the files/folders over to the corresponding folder of your Magento site, if developing locally.
If you are developing on a remote server, you can simply upload the app and skin folders to the Magento install on your server.
-
 1This can also be the name of your template package.2This can also be the name of your template package.
Magento uses a hierarchy system. Adding the files in the base folder will work with any theme package. You can also elect to add the layout, template, and skin files to your theme package folder (instead of base) in order to have the extension apply only to that theme. Anything placed in the theme package folder will override what exists in the base folder. Anything in the base folder is accepted as default.
If you download a RocketTheme Magento template, the extension files will all be included in the theme package folder, not the base folder.