RokComments: Setup Guide
Your Guide to Using RokComments for Joomla
Introduction
RokComments is built to work with several of the most popular Javascript-based comment systems. Setting them up is a simple process, and We have detailed the steps involved for each of the four (presently supported) platforms below.
Configuration
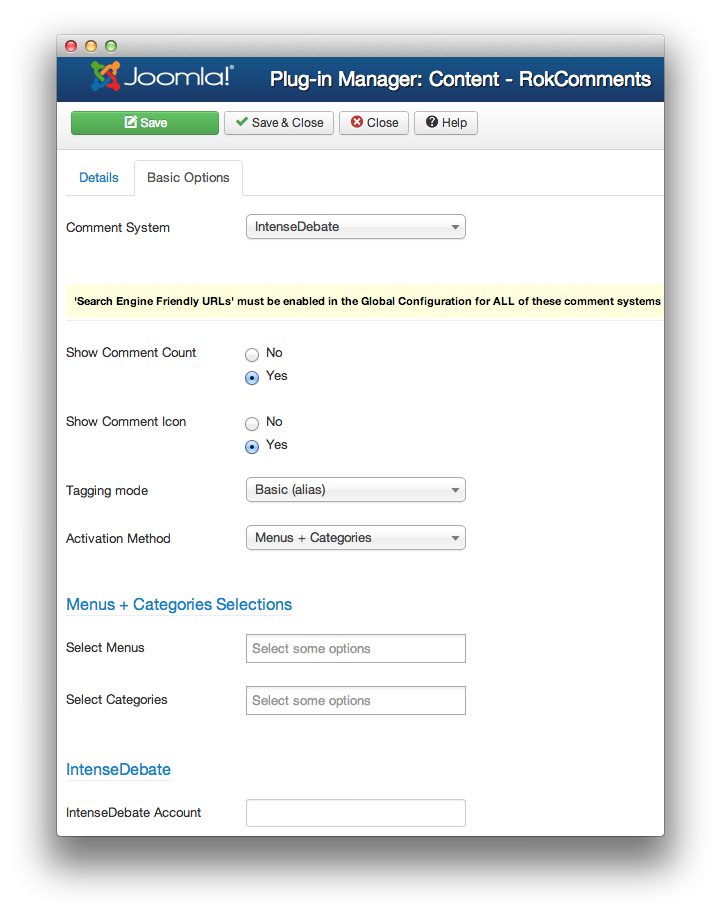
You can access the main configuration page for RokComments by navigating to Administrator -> Extensions -> Plugin Manager -> Content - RokComments. The Details tab of this page gives you the ability to set the publishing status, access levels, and Joomla ordering. The main configuration options for this plugin are set in the Basic Options tab. Below, we have outlined the available options.
-
 1Comment SystemChoose which platform you wish to use for commenting.2Show Comment CountShow the number of comments per article.3Show Comment IconShow the icon for the comment system.4Tagging ModeChoose between Basic (alias), Slug (id:alias), Path (article path) and Numeric (article ID) tagging options.5Activation MethodChoose how the comments are activated, whether automatically based on menu items and/or categories; or via manual insertion of code:
{rokcomments}.6Menu + Categories SelectionsChose which menus and categories you wish to load comments for.7Comment System Specific OptionsThere are varying fields for each commenting system to hook up RokComments.
Comment System: Choose which platform you wish to use for commenting.
Show Comment Count: Show the number of comments per article.
Show Comment Icon: Show the icon for the comment system.
Tagging Mode: Choose between Basic (alias), Slug (id:alias), Path (article path) and Numeric (article ID) tagging options.
Activation Method: Choose how the comments are activated, whether automatically based on menu items and/or categories; or via manual insertion of code:
{rokcomments}.Menu + Categories Selections: Chose which menus and categories you wish to load comments for.
Comment System Specific Options: There are varying fields for each commenting system to hook up RokComments.
IntenseDebate
To setup RokComments to use IntenseDebate, you first have to sign up at http://intensedebate.com.
Once you have created an account, you need to select Sites from the top menu, then click + Add blog/site from the dropdown.
Enter the URL to your website and click Next Step.
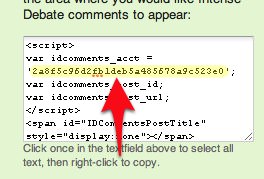
For Step 2, choose Generic Install from the options, then click Next Step. This last page has the JavaScript that you normally would need to install the comments.
Just save the long string variable that is displayed in the idcomments_acct var. This is the only thing you will need to configure RokComments to use IntenseDebate.
Configure
Open up the RokComments Content Plugin via the Plugin Manager in the Joomla Administrator and set the following attributes:
- Set Comment System to IntenseDebate
- Enable/Disable the Show Comment Count and the Show Comment Icon options, as you desire.
- If you are using Menus + Categories for the Activation Method, ensure you select the correct Menus and/or Categories where you would like the comments to show.
- In the IntenseDebate Account input field, put the idcomments_act value you saved earlier. Example: 2a8f5c96e2fb1deb5a485678a9c523f0
The first step to integrating Facebook comments is to sign up as a Facebook developer. To do this you must enable and authorize the Facebook Developer application to access your Facebook account. Visit the FaceBook App Here and click Allow.
The next step is to click the + Create New App button on the Apps page. Enter something like My Site Comments in the App Display Name field, and some unique name for the App Namespace, such as mysite-comments, review and agree to the Facebook Platform Policies and click Continue.
Enter the Security Check validation and click Submit.
The next page is the Basic Settings, and here you need to enter your domain for the App Domain. Example: mysite.com.
You also need to click the Website block in the Select how your app integrates with Facebook section and put the URL of your website. Example: http://www.mysite.com.
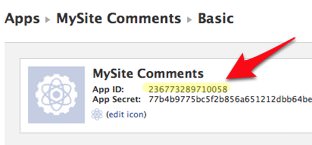
Lastly, copy the App ID value as you will need this to configure RokComments to use Facebook.
Configure
Open up the RokComments Content Plugin via the Plugin Manager in the Joomla Administrator. Set the following attributes:
Set Comment System to Facebook.
Enable/Disable the Show Comment Count option, as you desire. Show Comment Icon has no effect for Facebook.
If you are using Menus + Categories for the Activation Method, ensure you select the correct Menus and/or Categories where you would like the comments to show.
In the Facebook AppId input field, put the App ID value you saved earlier. Example: 236773289710058
Enter the width in pixels of the comment area, just adjust this field till it fits nicely under your content.
Enter a comma separated list of Facebook User IDs of people you want to be able to moderate these comments. Alternatively you can moderate them via the Developer Tools.
Disqus
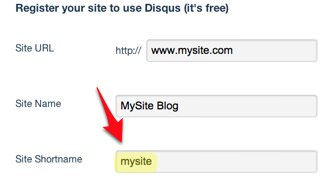
In order to use Disqus comments you need to first Sign Up at http://disqus.com. After signing up, you need to click the + Add button in the Your Sites sidebar section. Fill in the form with the information your site.
The shortname is important as this is the unique identifier you will use when configuring RokComments. On the Settings panel, configure the options as you like, or just leave the defaults before hitting Continue. You will be able to moderate these comments directly by going to the shortname URL. Example: http://mysite.disqus.com.
Configure
Open up the RokComments Content Plugin via the Plugin Manager in the Joomla Administrator. Set the following attributes:
Set Comment System to Disqus.
Enable/Disable the Show Comment Count and the Show Comment Icon options as you desire.
If you are using Menus + Categories for the Activation Method, ensure you select the correct Menus and/or Categories where you would like the comments to show.
In the Disqus Shorname input field, insert the shortname value you saved earlier. Example: mysite.
If you need to test the comments on an inaccessible website during development you can enable the Developer Mode option here.
Livefyre
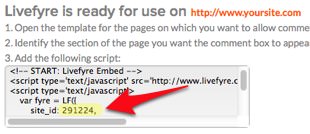
The first step to installing Livefyre comments on your site is to Sign Up via the http://www.livefyre.com website. When you have signed up, you should click Install, or go directly to the installation URL. Enter the URL of your site and click the Custom option for the Platform. When you are done, click the Keep Going! button.
That is all there is to it. You will be provided with a chunk of JavaScript, but all you need to do is copy the numeric site_id variable, as this will be used to configure RokComments to use Livefyre.
Configure
- Set Comment System to Livefyre.
NOTE: Comment Counts are not supported in Livefyre currently, so those options will be ignored.
If you are using Menus + Categories for the Activation Method, ensure you select the correct Menus and/or Categories where you would like the comments to show.
In the Livefyre Site ID input field, put the site_id value you saved earlier. Example: 291224